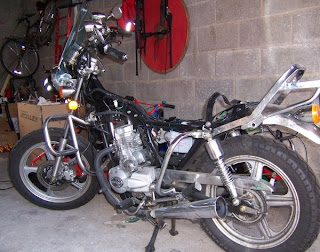
Saucy minx, flaunting her exposed frame like that! What's the occasion? We'll come to that in a minute. First, let's take a closer look while her kit's off.

That's the aforementioned K&N filter fitted to the carb. I'd previously thought that it was too big, and that it would foul the battery anyway, but it turned out that I just needed to cowboy up and clamp it on tighter. It was much easier with the carb removed, and while it's pressed tight against the battery, it's not under strain. In fact, it's partially holding the battery in place now, assisted by the traditional garden wire twisted around and over the battery.
Here's the void where the air box used to be: it could be used for more tools storage, or a sub-woofer...

The reason for taking the carb off was to fiddle with the jets. Following the advice from the usual suspects, I drained the float bowl (remember to turn the main fuel tap off first!) using the screw at the bottom of the carb. I then unbolted it from the engine intake and the old air box, removed the fuel and breather pipes, and wiggled it free from its mounts. Three small bolts underneath hold the float bowl on. With them removed, the main jet is exposed, in the centre at the bottom. I was surprised to find that the stock jet is only a 90 (i.e. 0.9mm diameter). I'd bought a 105 from Xian, and tried that, but it was too big, even with the K&N filter. Another next-day order secured 95 and 100 jets, and the 100 seems to suit nicely.
While I had the carb off, I also did the other recommended fix; raising the main needle. It's underneath the throttle cable on top of the carb. Unscrewing the end of the throttle cable reveals the spring that presses the needle down. Carefully pulling this clear of the top of the throttle slide revealed the top of the needle, with a circlip around it and another clip over it holding it down. With it all disassembled, I found that the circlip was in the middle of 5 grooves. I moved it to the bottom groove, effectively raising the needle and letting more fuel through at 1/2 throttle and above. It was fiddly getting it all back together, but just took patience.
With those changes made, the bike feels gutsier throughout the rev range (and incidentally makes a distinctive growl under throttle). These are definitely changes worth making.
Now... why is the bodywork off? The stock black has a nice finish, but I can't be doing with the Houniao branding, so it's time to break out the rattle can and wet-and-dry paper, and pimp things up another notch.

That's the front mudguard (Pioneer Nevada), tank and side panels. I won't be doing the rear mudguard, at least not initially, as I'm investigating alternatives. Well, I wouldn't be happy if I'd run out of things to tweak.
The parts are currently on about their 4th thin layer of white undercoat. They'll get another gentle sand and coat tonight, then tomorrow morning, I go for it with a can of Plasti-kote metallic glitter copper/bronze sourced from the local B&Q. Wish me luck.


jeez, you gone mad.. ;)
ReplyDeleteThe hardest part is knowing that it'll be off the road for the best part of a week as I layer up the paint. It was going great guns until tonight when I smoothed the first three layers of colour coat and started on a 2nd can which ran like a French soldier. Gaaah! Must... wait... 24 hours... before sanding down...
ReplyDeleteWhere did you get the jets from mate? What size/type are they etc.? Just ordered a sexy air filter like yours :P Not sure what size jet to get though.
ReplyDeleteAnd I will love you forever mate if you put a sub where the filter used to be ;)
Hi Sam, I've answered you over at your blog.
ReplyDeleteThe sub-woofer is still on the long term list. Actually, the space where the air box was is handy for storage: you can fit a Burger King large diet coke in there. ;)