
Sacrifice to the Gods of Entropy and they may eat you last.
Things that I have learned:
- 1.5mm mild steel is arc weldable, but not necessarily by me.
- Sometimes, close enough isn't good enough.
- There's nothing you can damage with an arc welder that can't be fixed with an angle grinder, or vice versa.
My first attempt at welding in a section of pipe wasn't a total success. I used 38mm OD 1.5mm mild steel (35mm ID), which is at the lower end of what's arc weldable. Cut to the chase, I got it butchered together, but made a serious snafu: once it was all welded up, the exhaust plain didn't fit, no matter much much I swore, pleaded, or tried to negotiate with it.
I did a fair bit of offering up, then removing, tacking and re-offering but made one fatal error - I didn't tighten up the manifold nuts when offering the exhaust up. Consider that a few degrees of difference at the manifold means an inch or so at the tail joint. One I had it all welded solid, I could choose between a tight seal at the manifold and a clear 1" gap at the tail, or have the exhaust bolted on but spitting from the manifold.
In the event, I called a Mulligan, and decided to do it over. Since I'd burned through so much of the 1.5mm tube, I decided to go bigger. 2mm would likely be OK, but I wanted to be sure and went to 3.2mm, with an OD of 42.4mm = ID of 36mm. This was likely too big; an ID of 33 or 34mm would be a snugger fit, but you can always narrow wide pipe down.
First things first. This time, I'd be doing some serious welding with the exhaust on the bike, so the tank and battery had to be removed and buried 6' deep (well, balanced on top of the bins out the back, anyway):

Then I ground off the 1.5mm pipe section from the left hand pipe. As always, it took longer than I'd expected, and there must have been a small earthquake or similar, as I... uh... ground almost all the way through at one point. Mind Control Lasers, maybe.
Aaaaanyway. Remember the adage: welding can fix anything that an angle grinder messes up, and t'other way around too. A bit of 1.5mm patching over it covered up the evil. Let's never speak of it again.
I cut the the 3mm pipe to 1" longer than the removed section of cat-pipe. Another mistake I'd made the first time round was to make the replacement pipe too long. This meant that it went too far up the curve of the pipe on both ends, which contributed to screwing up the angles. See, I do learn, eventually.
Then each end of the pipe needed notches cut so that I could narrow it in. I'd recommend hacksawing these, rather than grinding them out, since the narrower they are, the easier it'll be to make them gas tight later:
Another lesson learned - this time I bolted the downpipe on solidly before even thinking about fitting the pipe. Note the car jack holding the lower section up at approximately the right height:

Then the ends of pipe section could be gradually narrowed down and offered up until it was fairly tight over both ends. I had to remove the whole assembly to bang it down tight. That's where your Anvil Shaped Object comes in handy. You do have an Anvil Shaped Object, right?
Once the new pipe was as tight as I could get it around the original exhaust, it all went back on again, and both ends of the exhaust were solidly attached. For those playing along at home: solidly attach both ends.
Then and only then did I weld up the joints. Rather than just tacking, I manned up and welded as much as I could manage in place. (Pro tip: remove the brake pedal on the right side to get more access to the bottom weld).
Only when I'd gone as far round the pipe as I could manage did I remove it. The unwelded parts of the pipe ends needed banging down again to get as tight a fit as possible. And the first thing I did then was to put it back on and check that it still fitted. See? Learning! See?
With everything seemingly OK, I removed the exhaust again and finally finished the welding. In my pre-emptive defence, it's a fiddly job, as you have to move the rod in 3 axes: rotate around the pipe, oscillate up and down to cover the joint, and move the rod in as it melts down. Very zen. Then there's the 8 notches in each end, 32 in all, that need sealed up. About 65 amps with a 2mm rod, for those taking notes.
Not the nicest welds in the world, but no, since you ask, I'm not planning on giving up my day job:

Fast forward, the 2nd exhaust went the same way, and a lot faster, since it was just a production line now. The bike fired up fine, this time with the exhausts seated properly. I found a few pinhole leaks, but they were quickly welded over, and some grinding neatened the welds up some:

...although they still need filing, filling and sanding before I paint over them, and I won't finalise that until I get a chance to take the bike out for a run. As usual for this winter, there's a localised Fimbulwinter on the stretch of road right outside my house. Hopefully my de-catted Penguin Murderatron will contribute to this alleged global warming which we could really do with round about now.
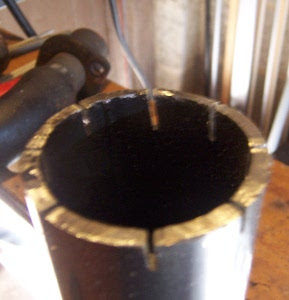
Speaking of which, here's one of the offending, offensive cats, the one that I didn't try and drill though:

You might think it wouldn't be hard to drill right through that. Well, think it all you like. It's harder than a scrap-yard dog with a flick knife.
Well, that's us 90% done. If I was doing it again, I'd try and get some 33 or 34mm ID 2mm pipe. Also, I wouldn't do it at all.
But since it's done, all that remains is a road test to see if I've helped, harmed or not done a damn thing to the performance. Nobody laugh; it could have helped it breathe. You'll see. You'll all see.


Awe - maa - gawd. >:-0 Awesomafiablyfantasmic!
ReplyDeletei did this, only instead of drilling into the cat i just got good old hammer and chisel and had at it... took longer than a drill but it made it clear.. about 99% clear the 1% being my bad weld that im going to sort soon.
ReplyDelete